While many other people would often scare you away from tuning your piano yourself, we won’t.
At the end of this article, you would know how to tune a piano properly. However, we must point out that it takes a bit of experience to get this right.

So, if you’re a beginner, we would suggest you take it to a professional instead. On the other hand, if you do already have some experience playing the piano, then buckle your seatbelts. It’s going to be a very long ride.
Table of Contents
Tools You’re Going To Need — How To Tune A Piano
Before we dive into the work, here is a list of all the tools you’re going to need. Some of these might be a little expensive.
However, don’t be dismayed. Remember that this is a long-term investment as you won’t have to buy these tools the next time you want to tune your piano.
Piano Tuning Lever
This is also sometimes called a hammer, a key, or a wrench. Whatever name it is, this is probably the most important tool in your tool kit for tuning your piano. So, we would advise that you spend a little extra to get something that is top-quality.
To get the easiest-to-use piano tuning lever, try narrowing your search using “apprentice” or “student”. These will give you the best tools that are designed for beginners. You should be able to get something decent for around $50.
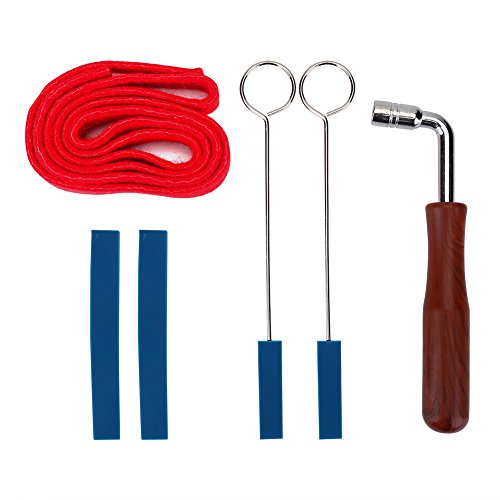
Make Sure To Choose The Right Piano Tuning Lever Tip
These tuning levers have different sizes of tips. To get the best result as a beginner, we suggest you get a piano tuning lever with size #2. That’s the easiest to start with, and it’s also the most widely used in modern pianos.
The smaller tip #1 is used for a select few European pianos. It’s better suited to professionals because it provides more control. The larger tip #3 is more suited to replacing damaged pins. It’s used because of its ability to grip more of the pins.
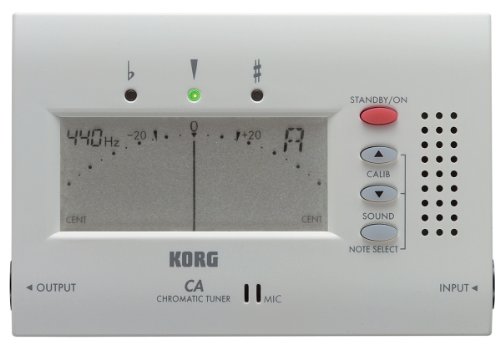
Chromatic Tuner
The next tool you’ll need to invest in is a chromatic tuner, otherwise known as an electronic tuner. If you already have a guitar tuner, sadly, it won’t work. You need an actual piano tuner. A piano tuner will be able to recognize all the notes on the piano, as opposed to the guitar tuner.
Now chromatic tuners are very expensive. You should be willing to spend anything from $500, to as much as a thousand dollars, on a quality chromatic piano tuner.

Tuning Software
While a chromatic tuner is more preferable, if you don’t have the budget, there’s no need to panic. You can get a tuning software instead. In fact, there are many companies who give you more control with the digital tuner, compared to the electronic tuner.
We suggest you try out the program first before you purchase. And also get an external microphone for the best results.
There are a lot of tuning softwares out there and because we wouldn’t want you to get lost in the search, we suggest you watch the video below. It features some of the best software tuners out there. It should help narrow the search down by a ton.
Get Some Mutes
These are very much the most inexpensive thing you can have in your arsenal, typically set you back only a few dollars for each piece.
Because they are so cheap, we suggest getting anywhere around 10 different types and sizes. Some will work well with lower strings, while others will work well with the higher strings.
Also, mix up the types. Get normal rubber mutes, felt strips, and plastic tweezers.
Before We Begin… Huge Disclaimer — How To Tune A Piano
We Are Not Trying To Replace Professionals
As much as we are trying to provide help, the content on this page should in no way replace the work of a professional. This tuning method should only be used to touch up your piano before it’s due a professional visit.
Or if you’re a professional player who needs to get on stage soon and just needs a little touch-up. Do not try to always tune yourself without going to a professional once in a while. It’s not advisable.
Pianos Are Quite Complex
Getting all the keys tuned properly can be quite challenging and tasking. Take a deep breath, have a lot of patience, and read every instruction over and over again until you fully understand it.
If your piano has been left untuned for a very long time, it may not be able to hold a tune any longer. You would need a pitch-raise on the entire keyboard before it’s able to hold a tune again.
Also, if certain pins are damaged, misaligned, or loose, they’ll need repairs. And unfortunately, the knowledge in this article doesn’t cover that. So, you’ll need professional help.
Weigh The Factors
There is definitely a high risk in doing this. You might break, bend, or loosen pins in the process. Any of these will lead to more damage that would need repairs.
We don’t suggest you try this with a Steinway or other very expensive pianos. If you have a student or a very affordable piano, then you can try this.
Now that you know the risk involved, if you’re still willing to do this, then let’s get on with it. You’ll need to rid the area of people. Block all sound sources. Lock the doors and put a “do not disturb” sign behind it. Open the piano lid. Remove all the cabinet members (this shouldn’t require more than a basic screwdriver).
Tuning The Piano — How To Tune A Piano
The most common and standard way of tuning the piano is known as “A440”. This means that the A4 is tuned such that its sound waves vibrate at 440 Hertz. This pitch is what you would find at most concerts in the Western world. However, European tuning is slightly different at 442 Hertz.
Start With The Middle C — Step 1

The middle C is also referred to as the middle octave or the C4, upward to C5. Every key in this space strikes 3 strings. Sometimes it can be two.
If it’s three (which it would most likely be), start with the middle string. Carefully look for the pin that turns the middle string, which is the one you want to tune. Once you’ve found it put the lever such that its socket is completely on the pin.
Now you’ll need to mute the other two strings. To do this, gently step on the sustain pedal so you lift the dampers off the strings. This will guard the felt of the dampers as you are placing the mutes. Put your mutes on the strings to stop their vibration. Remember not to put it too tight so that the string is not deformed.
When you’re tuning it’s important you keep this simple yet profound statement in mind “left loose, right tight”. This means turning the pin counter-clockwise loosens the string, flattening the note while going the opposite direction tightens the string.
Loosen the string a bit. Then, as you strike the key continuously, move the lever to the right slightly, until your chromatic tuner shows that the key is now in tune. If you get a good tuner like the Korg CA-40, it would automatically detect what note you’re trying to tune.
If the note is very off, though, it might think it’s another key, which is why you need to know beforehand what key is what on the piano.
Matching The Remaining Two Strings — Step 2
Remember we said there are three strings for each key in the middle octave. Now that you’ve tuned the first key, you’ll need to match the other two strings to the one you’ve already tuned. This process is referred to as “tuning the unisons”.
Remove one of the two mutes you place on the first and third strings. This means that your tuned string and another string of your choice are unmuted, but the third is still muted.
Don’t use the chromatic tuner.
When tuning unisons, it is advised that you tune it by ear, as opposed to using a chromatic tuner. To do this, strike the key again and turning your lever which is now on the untuned free string, strike the key hard.
Turn the lever slightly in either direction until both of these strings sound like one note, as opposed to two notes in disharmony.
Once you’ve tuned this string, move on to the last string and do the same without muting any of the strings. Once you’ve done this, hit the key hard and you would find that all three strings would sound as one note, tuned to your chromatic tuner.
Repeat the whole of step one and two for every note between C4 and C5. Once you’ve completed this octave, it means you’ve “set the temperament”. In the next step, we’re going to show you how to use the octave you’ve tuned as a reference for tuning the rest of the piano.
Tuning By Comparing Various Octaves — Step 3
Now that you have tuned the middle octave and set the temperament, you can use this as a reference to tune all the other keys.
To start with, tune the octaves that are directly below or above the middle octave by ear, matching them to the corresponding notes on the middle octave. Like the notes in the middle octave, start one string at a time (remembering to mute the others).
Once you’ve tuned one string, tune the unisons the same way we taught you in step two. Then, work your way up the other notes in the same fashion, one octave after another. (e.g A5-A6, then A6-A7, and so on).
Just like unisons, there is no set order for the progression of tuning the keys. It’s totally up to you. However, we would advise that you have a pattern in mind so that you don’t miss any octave as you’re tuning. Also, alternating between the higher and lower octaves will ensure that the tension on the soundboard is equalized, keeping your results stable.

Frequently Asked Questions Concerning Piano Tuning
What If I Just Want To Tune A Few Strings?
Yes, there are some situations where one is playing and notices that are a few keys are out of tune. You might not necessarily need to tune the whole keyboard, just those few strings.
If that’s the case, you simply need to tune that particular note, using your middle octave as a reference. Do not use a chromatic tuner, unless you are certain that it can show frequencies for octaves other than the middle octave.
What Would A Professional Piano Tuner Do Better?
A whole lot of things!
You might be able to listen as good as a tuner if you’re an experienced musician. However, that’s only one part of the whole story.
The second part is the ability to move the lever with such precision that the results are not only accurate but stable, as well.
That lever-work requires a level of skill that can only be attained by proper training, study, and a lot of experience.
Professionals would most likely have done the same process upwards of a hundred times before touching your piano. So you definitely wouldn’t be able to compare results with you that’s just doing it for the first time.
Also, apart from tuning, a professional will be less likely to loosen or break pins, because of their experience. And, they are also able to repair and service the voice of the piano.
Conclusion
This article is only to help you get started with tuning a piano. If you want to do this professionally, then you’re going to need a lot more training than a one-page site.
However, if you have a small affordable piano and don’t want to spend too much tuning every year, this should help you out.
And don’t forget “left loose, right tight”! That’s How To Tune A Piano.